
Kirby Kitchen Master Yeast Dough
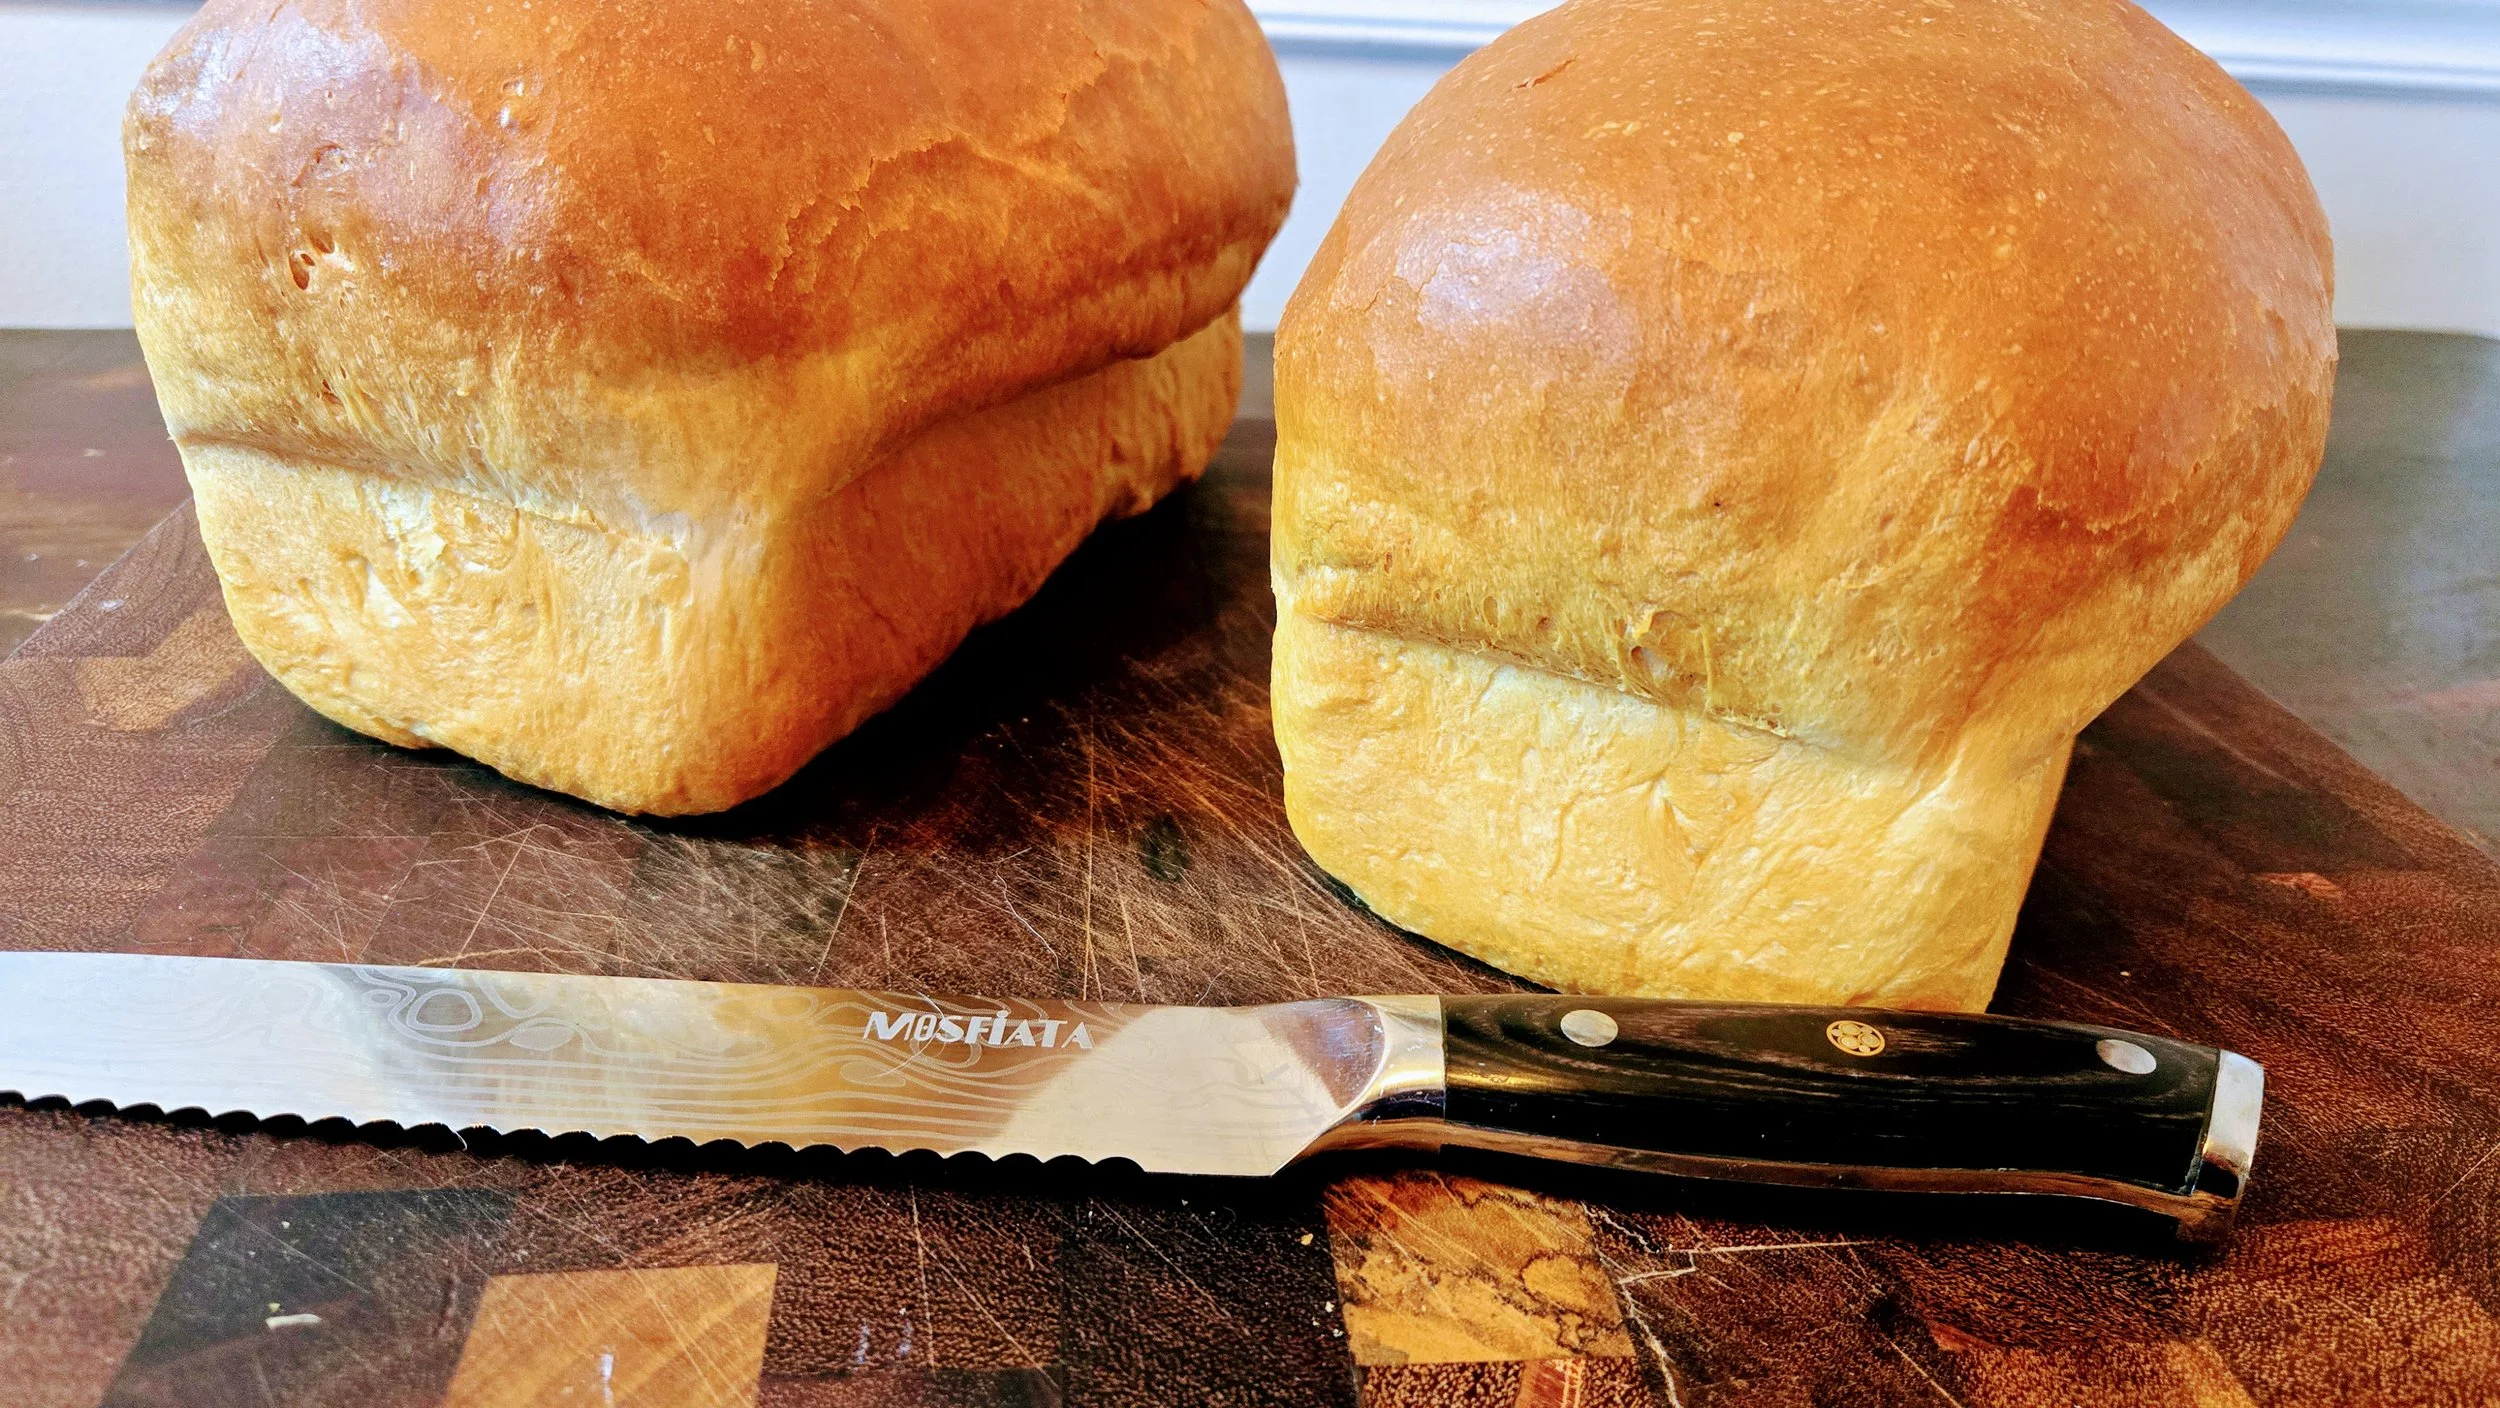
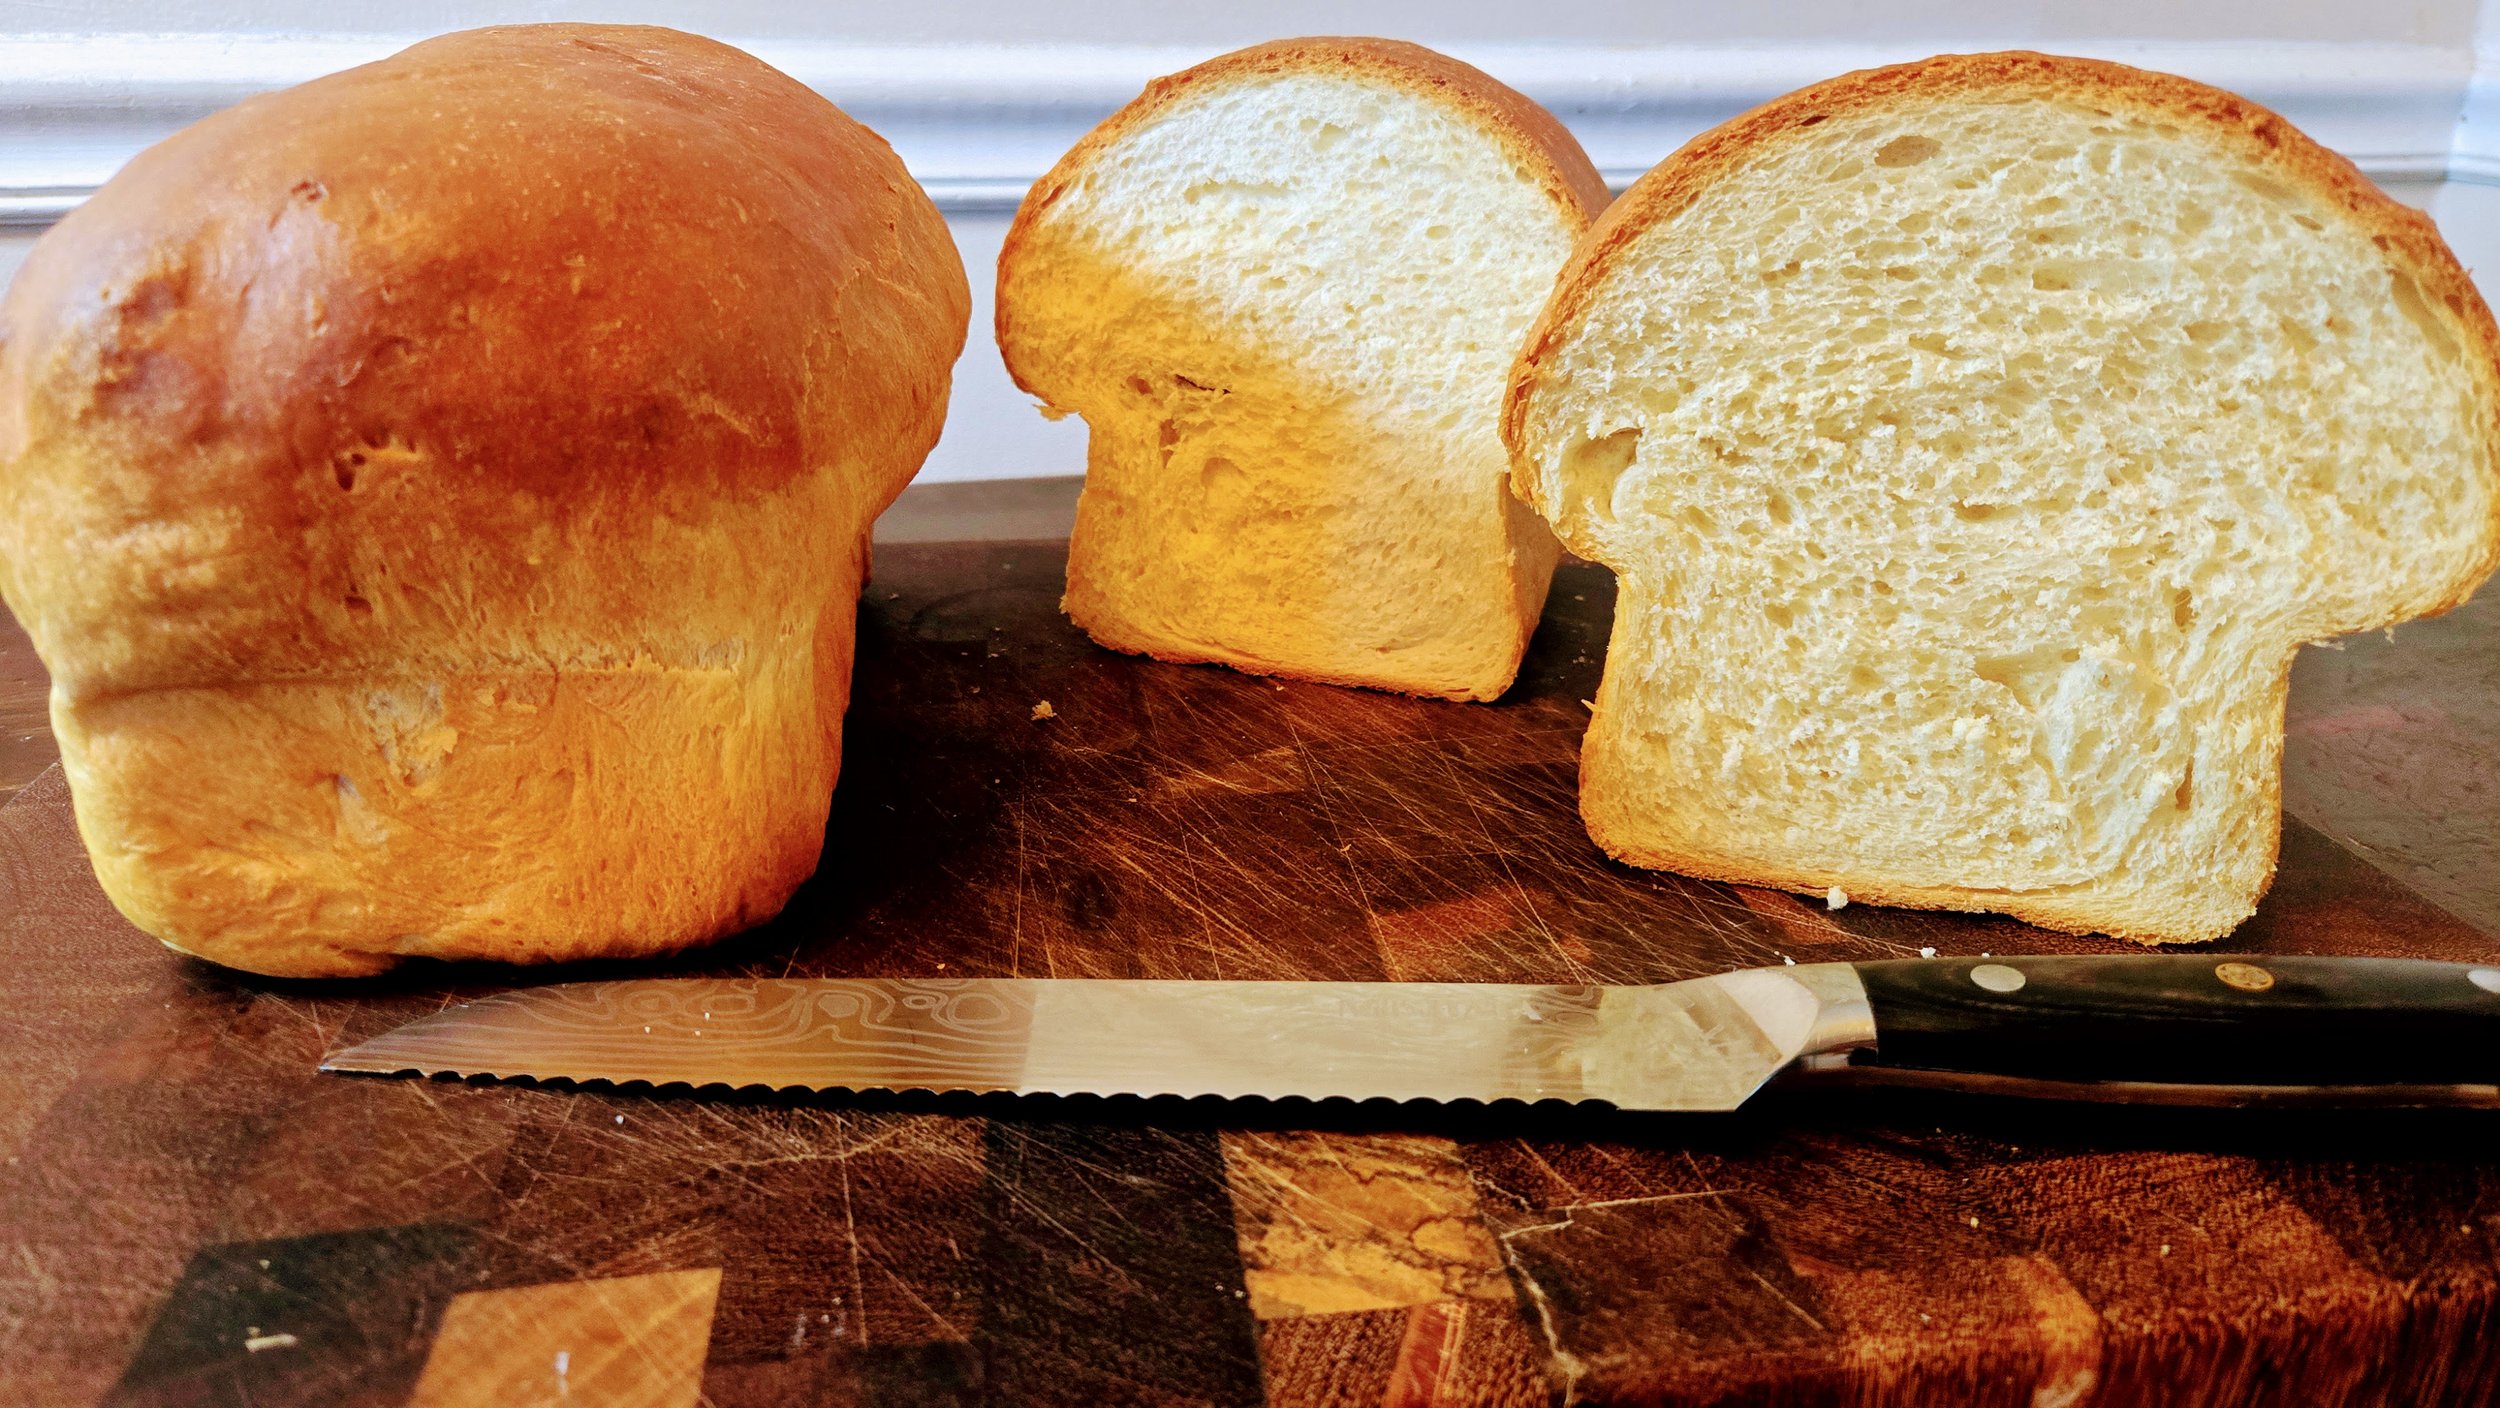
One dough. Countless possibilities. Built to become the bread your kitchen needs.
A soft, enriched yeast dough made with Fairlife 2% milk, honey, butter, eggs, and the Tangzhong method for a tender crumb that stays soft longer.
Make sandwich bread today, then use the same foundation for dinner rolls, burger buns, hot dog buns, hoagie rolls, sliders, and more.
Every kitchen needs a bread recipe it can depend on.
There are recipes you make once.
Then there are recipes that become part of how you cook.
Kirby Kitchen Master Yeast Dough was developed to be the second kind.
Instead of keeping separate dough recipes for sandwich bread, dinner rolls, burger buns, hot dog buns, and hoagies, this recipe creates one dependable foundation that can become whatever bread the meal calls for.
The Tangzhong method helps create a soft, moisture-rich crumb, while Fairlife 2% milk, eggs, butter, and honey turn a basic yeast dough into something rich enough to stand on its own but versatile enough to use throughout the kitchen.
Master the dough.
Then change the shape.
Recipe at a Glance
Yield: 4 sandwich loaves or equivalent amount of shaped bread
Total Flour: 2,000 g
Prep Time: About 30–40 minutes
First Rise: Approximately 60–90 minutes
Second Rise: Approximately 45–75 minutes
Bake Time: Varies by shape and bakeware
Finished Loaf Temperature: 190–195°F
Ingredients
🥛 Tangzhong
80 g bread flour
200 g Fairlife 2% Ultra-Filtered Milk
200 g water
🍞 Master Dough
1,920 g bread flour
500 g Fairlife 2% Ultra-Filtered Milk, room temperature
500 g warm water, approximately 105–110°F
32 g active dry yeast
80 g honey
4 large eggs, room temperature
40 g fine sea salt
160 g unsalted butter, softened
All of the cooled Tangzhong
Instructions
1. Prepare the Tangzhong
Add the 80 g bread flour, 200 g Fairlife 2% milk, and 200 g water to a saucepan.
Whisk until completely smooth.
Place over medium-low heat and cook while stirring constantly.
As the mixture heats, it will gradually thicken.
Continue cooking until it reaches a thick, pudding-like consistency and a spatula dragged across the bottom leaves a visible path.
Remove from the heat.
Transfer to a clean bowl and allow it to cool completely before making the dough.
Kirby Rule: Tangzhong allows part of the flour to absorb and retain more moisture, helping create bread with a softer crumb that stays fresh longer.
2. Activate the Yeast
Combine:
500 g warm water
32 g active dry yeast
Approximately 1 tablespoon of the honey (17g)
Stir gently.
Let stand for 5–10 minutes, until the yeast becomes visibly foamy.
If the yeast doesn't show signs of activity, don't continue with the entire batch. Check the water temperature and yeast before sacrificing 2 kilograms of flour.
3. Build the Dough
Add the activated yeast mixture to your mixing bowl.
Add:
Remaining honey (63g)
Fairlife 2% milk
Eggs
Cooled Tangzhong
Mix briefly to combine.
Add:
1,920 g bread flour
40 g fine sea salt
Do not add the butter yet.
Choose your mixing method below.
🌀 Option 1: Spiral Mixer
Begin mixing on low speed until all of the flour has hydrated and a cohesive dough forms.
Continue mixing until the dough begins developing noticeable strength and elasticity.
Once the dough has begun developing its gluten structure, gradually add the 160 g softened butter in several additions.
Allow each addition to incorporate before adding more.
Increase to medium speed and continue mixing until the dough becomes smooth, elastic, and pulls cleanly from the bowl.
Check for proper gluten development using the windowpane test.
Kirby Rule: Develop the dough before adding the butter. Fat makes bread tender, but adding it too early can interfere with gluten development.
⚙️ Option 2: Standard Stand Mixer
Because this is a large four-loaf batch, do not attempt the full recipe in a mixer that isn't rated for this quantity of dough.
Divide the recipe into smaller batches if necessary.
Fit the mixer with a dough hook.
Mix on low speed until the ingredients form a cohesive dough.
Increase to medium-low and knead for approximately 5–7 minutes to begin developing the gluten.
Gradually add the softened butter.
Continue kneading until the butter is completely incorporated and the dough becomes smooth and elastic.
Depending on the mixer and batch size, this may take another 5–8 minutes.
Kirby Kitchen Tip: A standard household mixer shouldn't have to fight the dough. Divide the batch rather than overheating or damaging the mixer.
✋ Option 3: By Hand
For easier handling, divide the ingredients into 2 smaller batches.
Mix the flour, liquids, eggs, honey, Tangzhong, yeast mixture, and salt until a shaggy dough forms.
Turn onto a clean work surface.
Knead until the dough begins developing strength.
Gradually work in the softened butter.
The dough may become slippery and messy at first.
Keep working it.
Continue kneading until the dough becomes smooth, elastic, and passes the windowpane test.
The Windowpane Test
Regardless of the mixing method, the finished dough should reach the same point.
Pinch off a small piece.
Gently stretch it between your fingers.
The dough should stretch into a thin, translucent membrane before tearing.
If it tears immediately, continue kneading and test again.
4. First Rise
Shape the dough into a large ball and place it in a lightly greased container with enough room to expand.
Cover.
Allow the dough to rise in a warm area for approximately 60–90 minutes, or until roughly doubled in size.
Enriched dough can move more slowly than lean bread dough.
Use the appearance of the dough rather than the clock as the final judge.
Kirby Rule: The clock tells you when to check the dough. The dough tells you when it's ready.
5. Divide the Dough
Turn the risen dough onto a clean work surface.
Gently deflate the largest air pockets.
Weigh the complete batch.
Divide the total weight by 4 to create four equal sandwich loaves.
Using a scale instead of guessing helps all four loaves proof and bake at approximately the same rate.
6. Shape the Sandwich Loaves
Working with one portion at a time, gently press the dough into a rectangle approximately the width of your loaf pan.
Starting from one short end, roll tightly into a log.
Pinch the seam closed.
Tuck the ends underneath and place the loaf seam-side down in a lightly greased loaf pan.
Repeat with the remaining dough.
7. Second Rise
Cover the pans loosely with a clean kitchen towel or lightly greased plastic wrap.
Allow the loaves to rise for approximately 45–75 minutes.
For an open-top sandwich loaf, look for the dough to become noticeably puffy and rise to approximately 1 inch above the rim of the pan.
Don't force the bake because the timer has expired.
8. Choose Your Pan & Oven Method
🥈 Stainless-Steel Loaf Pans
Conventional Bake
Temperature: 375°F
Rack Position: Lower third
Place a pizza steel or heavy baking sheet on the lower rack while the oven preheats.
Place the stainless-steel loaf pans directly onto the fully preheated steel or baking sheet.
This provides additional heat underneath the pans and helps prevent pale or underbaked bottoms.
Convection Bake
Temperature: 350°F
Rack Position: Lower third
Use the same preheated pizza-steel or baking-sheet method when available.
Begin checking approximately 5–10 minutes earlier than conventional bake.
Kirby Rule: Stainless steel can produce a beautifully baked loaf, but don't judge it by the top alone. Make sure the bottom has finished too.
🍞 Standard Metal Loaf Pans
Conventional Bake
Temperature: 350°F
Rack Position: Center
Convection Bake
Temperature: 325°F
Rack Position: Center
Begin checking approximately 5–10 minutes earlier with convection.
Dark nonstick pans may brown the sides and bottom faster than lighter aluminum pans.
🥛 Glass Loaf Pans
Conventional Bake
Temperature: 325°F
Rack Position: Center
Convection Bake
Temperature: 300°F
Rack Position: Center
Conventional baking is preferred for glass.
Never place a cold or room-temperature glass loaf pan directly onto a preheated pizza steel, baking stone, or extremely hot baking sheet.
Avoid sudden temperature changes that could cause thermal shock.
🔥 Smoker Method
Use stainless-steel or standard metal loaf pans.
Smoker Temperature: 350°F
Pecan, apple, and cherry wood all work well.
Keep the smoke light.
This is soft sandwich bread, so the smoke should provide a subtle background flavor rather than turning the loaf into barbecue.
Smokers vary considerably in airflow and heat distribution, so use internal bread temperature rather than the clock alone.
9. Bake
Bake until the loaves are golden, fully set, and reach approximately 190–195°F internally.
Approximate Starting Ranges
Stainless Steel: 30–40 minutes
Standard Metal: 30–40 minutes
Glass: 35–45 minutes
Smoker: 30–45 minutes
Begin checking toward the low end of the range.
If the tops become too dark before the centers are finished, loosely tent with aluminum foil.
How to Tell When It's Done
The loaves should:
Be golden across the top
Have risen into a rounded crown
Pull slightly away from the sides of the pans
Feel firm underneath
Sound somewhat hollow when tapped
Reach 190–195°F internally
Insert the thermometer into the center of the loaf.
Kirby Rule: Time and temperature get you close. Internal temperature tells you when the bread is actually finished.
10. Optional Gloss Finish
For a softer, glossy crust, combine:
2 Tbsp melted butter or ghee
2 tsp honey
Brush lightly over the hot loaves immediately after baking.
The butter softens the crust while the honey adds a subtle sweetness and shine.
11. Cool
Allow metal-pan loaves to rest for approximately 5–10 minutes.
Allow glass-pan loaves to rest for approximately 10 minutes.
Remove the bread from the pans and transfer to wire racks.
Cool for at least 1 hour before slicing.
Kirby Rule: Soft sandwich bread needs time for the crumb to set. Cutting it while hot can compress the loaf and create a gummy interior.
Turn the Master Dough Into Something Else
The four-loaf batch doesn't have to become four sandwich loaves.
Once the dough completes its first rise, portions can be shaped into different breads.
🍽️ Pull-Apart Dinner Rolls
Portion approximately 60–70 g per roll.
Shape into tight balls and arrange close together in a buttered baking dish.
Allow to rise until touching.
Bake until golden and approximately 190°F internally.
Brush with melted butter or ghee.
🍔 Pitmaster Burger Buns
Portion approximately 100–110 g per bun.
Shape into tight balls and flatten gently into approximately 4-inch discs.
Proof until puffy.
Brush with egg wash and add sesame seeds if desired.
Bake until golden and approximately 190°F internally.
🌭 Frank-Loader Hot Dog Buns
Portion approximately 80–90 g each.
Flatten into rectangles.
Roll tightly into cylinders and pinch the seams closed.
Proof until puffy and beginning to touch.
Brush with egg wash and bake until golden.
🥖 Pit-Style Hoagie Rolls
Portion approximately 140–150 g each.
Shape into elongated rolls with good surface tension.
Proof until puffy.
Score before baking.
Bake until deeply golden and approximately 195°F internally.
Performance Notes
🥛 Why Tangzhong?
Tangzhong cooks a small portion of the flour with liquid before the dough is mixed.
This allows that flour to hold considerably more moisture.
The result is a softer crumb and bread that stays tender longer after baking.
🥛 Why Fairlife 2%?
Fairlife 2% provides the dairy component while bringing additional protein and enough richness for a soft sandwich loaf.
Whole milk can be substituted if needed.
🍯 Honey Instead of Sugar
Honey provides sweetness while contributing additional moisture and a subtle flavor that works well across sandwich bread, dinner rolls, and buns.
This isn't intended to be a sweet bread.
The honey is there to support the dough, not dominate it.
🧈 Butter Goes Last
Butter contributes tenderness and richness.
But gluten gets a head start first.
Developing some structure before incorporating the fat gives the dough a stronger foundation while still producing a soft finished crumb.
🌀 Built for a Large Batch
The full recipe produces enough dough for four sandwich loaves, making it well suited to larger-capacity mixers.
Smaller mixers and hand kneading still work.
Simply divide the recipe into manageable batches.
Storage
Room Temperature
Store completely cooled bread in an airtight container or bread bag for up to 4 days.
Refrigerator
Refrigeration can dry bread faster, so room-temperature storage is preferred for bread you'll eat within a few days.
Freezer
Freeze completely cooled loaves for up to 3 months.
For convenience, slice the bread before freezing and remove individual slices as needed.
Kitchen Wisdom
“Master one good dough and you don't need five bread recipes. You need five ways to shape it.”
Firehouse Bacon Jalapeño Cheddar Bread
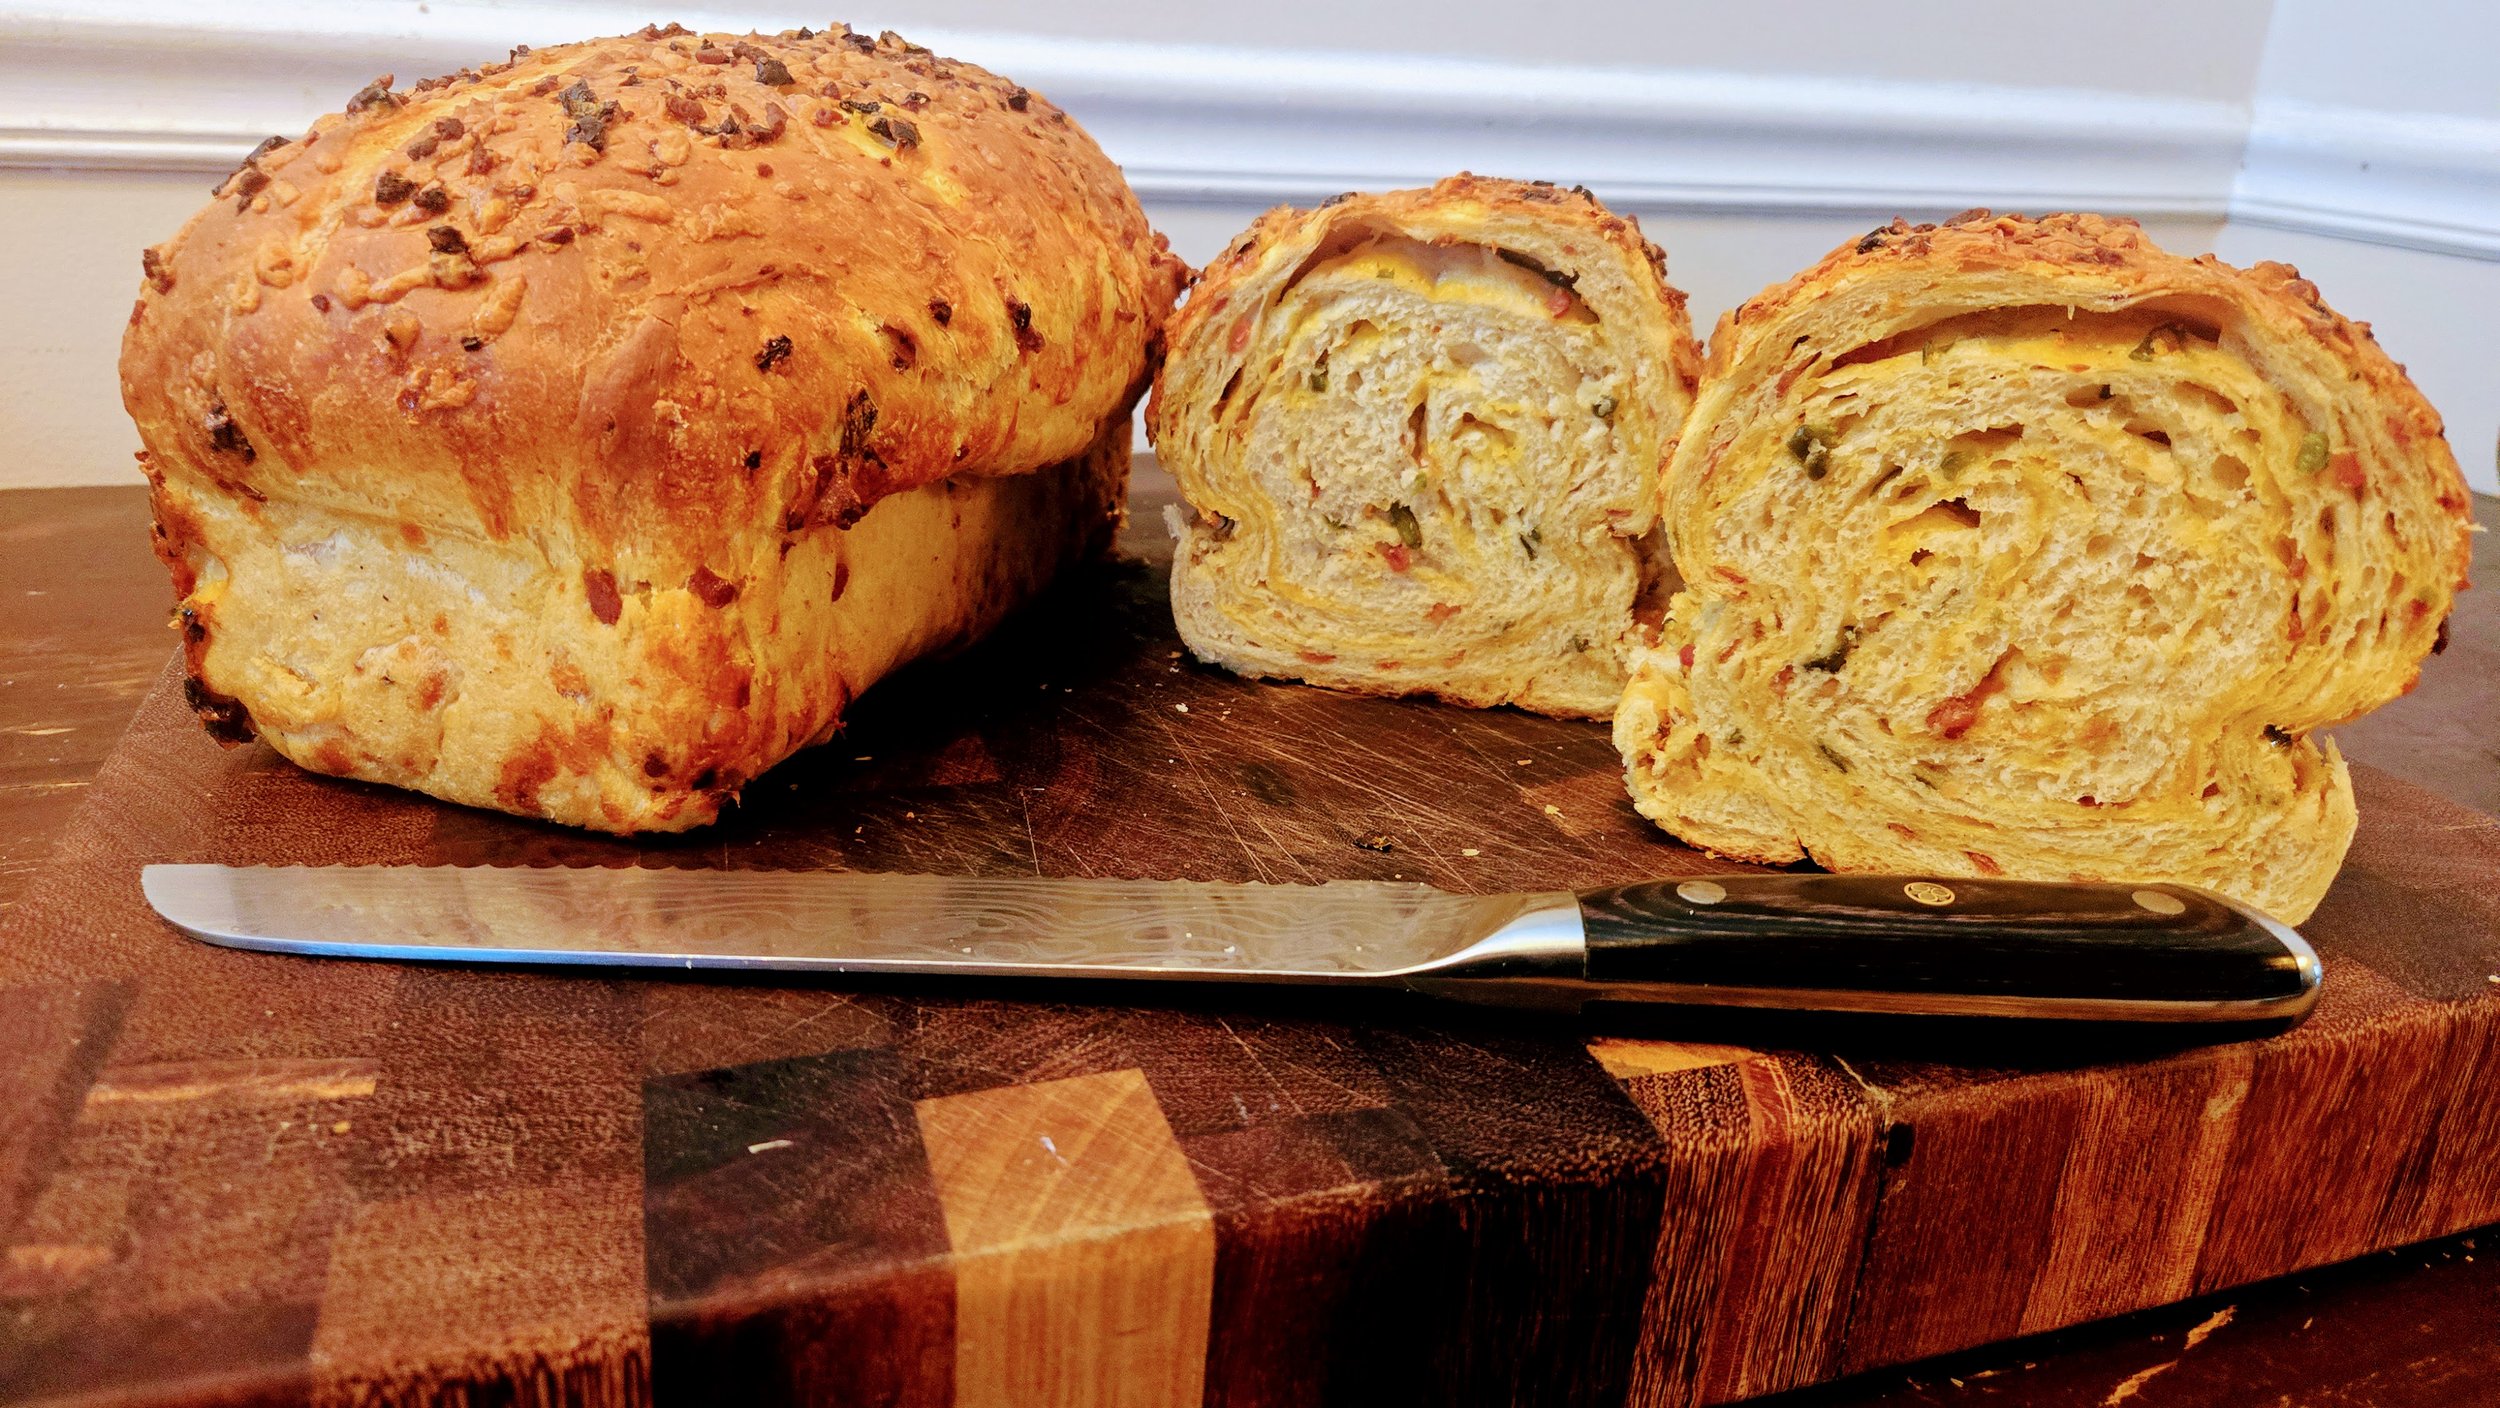
Smoky bacon. Sharp cheddar. Jalapeño heat. Fresh bread with a little Firehouse attitude.
A savory yeast bread loaded with sharp cheddar, smoky bacon, jalapeños, and Firehouse Seasoning. Baked until golden with a tender, chewy interior and pockets of melted cheese, bacon, and peppers throughout every slice.
This recipe makes two full loaves, because if you're going through the trouble of making homemade bread, you might as well have another one waiting.
Bread should be worth breaking out the butter for.
There are plenty of ways to make homemade bread more complicated.
This isn't one of them.
Firehouse Bacon Jalapeño Cheddar Bread starts with a simple yeast dough seasoned with Firehouse Seasoning before folding in sharp cheddar, smoky bacon, and plenty of jalapeños.
Fresh jalapeños work beautifully, but frozen jalapeños work just as well when properly thawed and drained. That makes this a great way to put peppers from the garden or freezer to work.
For the bacon, use fully cooked bacon crumbles for convenience or cook and crumble your own.
The dough can be mixed with a spiral mixer, a standard stand mixer, or completely by hand. The loaves can be baked in stainless steel, standard metal, or glass loaf pans using either conventional or convection heat.
And when you want another layer of flavor, fire up the smoker.
Serve it alongside dinner, toast a slice for breakfast, turn it into a sandwich, make an incredible grilled cheese, or just eat it warm with butter.
Recipe at a Glance
Yield: 2 loaves
Estimated Slices: 12 per loaf / 24 total
Serving Size: 1 slice
Prep Time: About 30 minutes
First Rise: 60–90 minutes
Second Rise: 30–60 minutes
Bake Time: Approximately 30–50 minutes depending on bakeware and oven mode
Bakeware: Stainless steel, standard metal, or glass loaf pans
Oven Temperature: 325–400°F depending on bakeware and oven mode
Finished Internal Temperature: 195–200°F
Ingredients
🍞 Bread Dough
1,000 g bread flour
650 g warm water, approximately 105–110°F
14 g active dry yeast
20 g honey
12 g kosher salt
2 Tbsp Firehouse Seasoning (20g)
30 g unsalted butter, melted and slightly cooled
🧀 Bacon Jalapeño Cheddar Filling
300 g sharp cheddar cheese, freshly shredded
120 g cooked crumbled bacon
150 g jalapeños, fresh or frozen
Reserve for Topping
From the amounts above, reserve:
50 g shredded sharp cheddar
20 g crumbled bacon
A small amount of prepared jalapeño
The remaining filling will be folded into the dough.
🥓 Choose Your Bacon
Quick Option: Pre-Cooked Bacon Crumbles
Use 120 g fully cooked bacon crumbles.
Pre-cooked bacon makes this bread considerably easier to prepare while still providing plenty of smoky bacon flavor.
Homemade Bacon Crumbles
Start with approximately 170–200 g raw bacon.
Cook in a skillet over medium heat until browned and crisp.
Transfer to a paper-towel-lined plate and allow the excess grease to drain completely.
Once cooled, crumble or finely chop.
Measure 120 g cooked bacon for the bread.
Kirby Rule: Bacon going into bread should already be fully cooked and well drained. Excess bacon grease can create heavy, greasy pockets inside the loaf.
🌶️ Prepare the Jalapeños
Fresh Jalapeños
Finely dice the peppers.
For less heat, remove the seeds and inner membranes.
For more heat, leave some or all of them intact.
Frozen Jalapeños
Thaw the jalapeños completely.
Transfer them to a fine-mesh strainer and allow the excess liquid to drain.
Spread the peppers onto clean kitchen towels or paper towels and gently press away additional moisture.
For even better results, place the drained jalapeños in a dry skillet over medium heat for 2–3 minutes, stirring occasionally.
The goal isn't to brown them. You're simply driving off some of the excess moisture released during freezing.
Transfer to a plate and cool completely before adding them to the dough.
Kirby Rule: Frozen peppers aren't the problem. The water they release is. Get rid of the excess moisture before it gets anywhere near the bread dough.
Instructions
1. Activate the Yeast
Add the warm water, honey, and active dry yeast to your mixing bowl.
Stir gently.
Allow the mixture to stand for 5–10 minutes, until the yeast begins to look foamy.
Kirby Rule: Warm water wakes up the yeast. Hot water can kill it. Aim for approximately 105–110°F.
2. Build the Dough
Add:
Bread flour
Firehouse Seasoning
Kosher salt
Melted and slightly cooled butter
Choose one of the three mixing methods below.
🌀 Mixing Option 1: Spiral Mixer
Begin mixing on low speed until the flour is fully hydrated and the ingredients come together into a rough dough.
Once no significant dry flour remains, increase to medium speed.
Continue mixing until the dough becomes smooth, elastic, and begins pulling cleanly away from the sides of the bowl.
The finished dough should feel slightly tacky but not wet.
Check the gluten development by gently stretching a small piece of dough between your fingers.
It should stretch into a thin membrane before tearing.
Kirby Rule: Watch the dough, not just the clock. Flour, humidity, water temperature, and room temperature can all change how quickly gluten develops.
⚙️ Mixing Option 2: Standard Stand Mixer
Fit a KitchenAid or similar stand mixer with the dough hook.
Mix on low speed until the flour is incorporated and a rough dough forms.
Increase to medium-low speed and knead for approximately 8–10 minutes.
The dough is ready when it is:
Smooth
Elastic
Slightly tacky
Pulling away from the sides of the bowl
Able to stretch without immediately tearing
If the dough still looks rough after several minutes, continue kneading rather than immediately adding more flour.
Kirby Kitchen Tip: Avoid running a standard stand mixer too aggressively with a heavy bread dough. Medium-low speed gives the dough time to develop without unnecessarily stressing the mixer.
✋ Mixing Option 3: By Hand
Mix the ingredients with a sturdy wooden spoon or dough whisk until a shaggy dough forms.
Turn the dough onto a lightly floured work surface.
Knead by hand for approximately 10–12 minutes.
Push the dough away with the heel of your hand, fold it back over itself, rotate, and repeat.
Continue until the dough becomes smooth and elastic.
Use additional flour sparingly.
A little tackiness is normal. Adding too much flour during kneading can create a dense, dry loaf.
The Windowpane Test
Regardless of which mixing method you choose, you're looking for the same finished dough.
Take a small piece and gently stretch it between your fingers.
If it can stretch thin enough for light to begin passing through before tearing, the gluten structure is sufficiently developed.
This is commonly called the windowpane test.
Don't Add the Filling Yet
The cheddar, bacon, and jalapeños do not go into the mixer during kneading.
Develop the dough first.
The filling will be incorporated by hand after the first rise.
This protects the bacon, cheese, and peppers from being pulverized and helps create distinct pockets throughout the finished bread.
Kirby Rule: Build the bread first. Fold in the good stuff second.
3. First Rise
Lightly grease a large bowl.
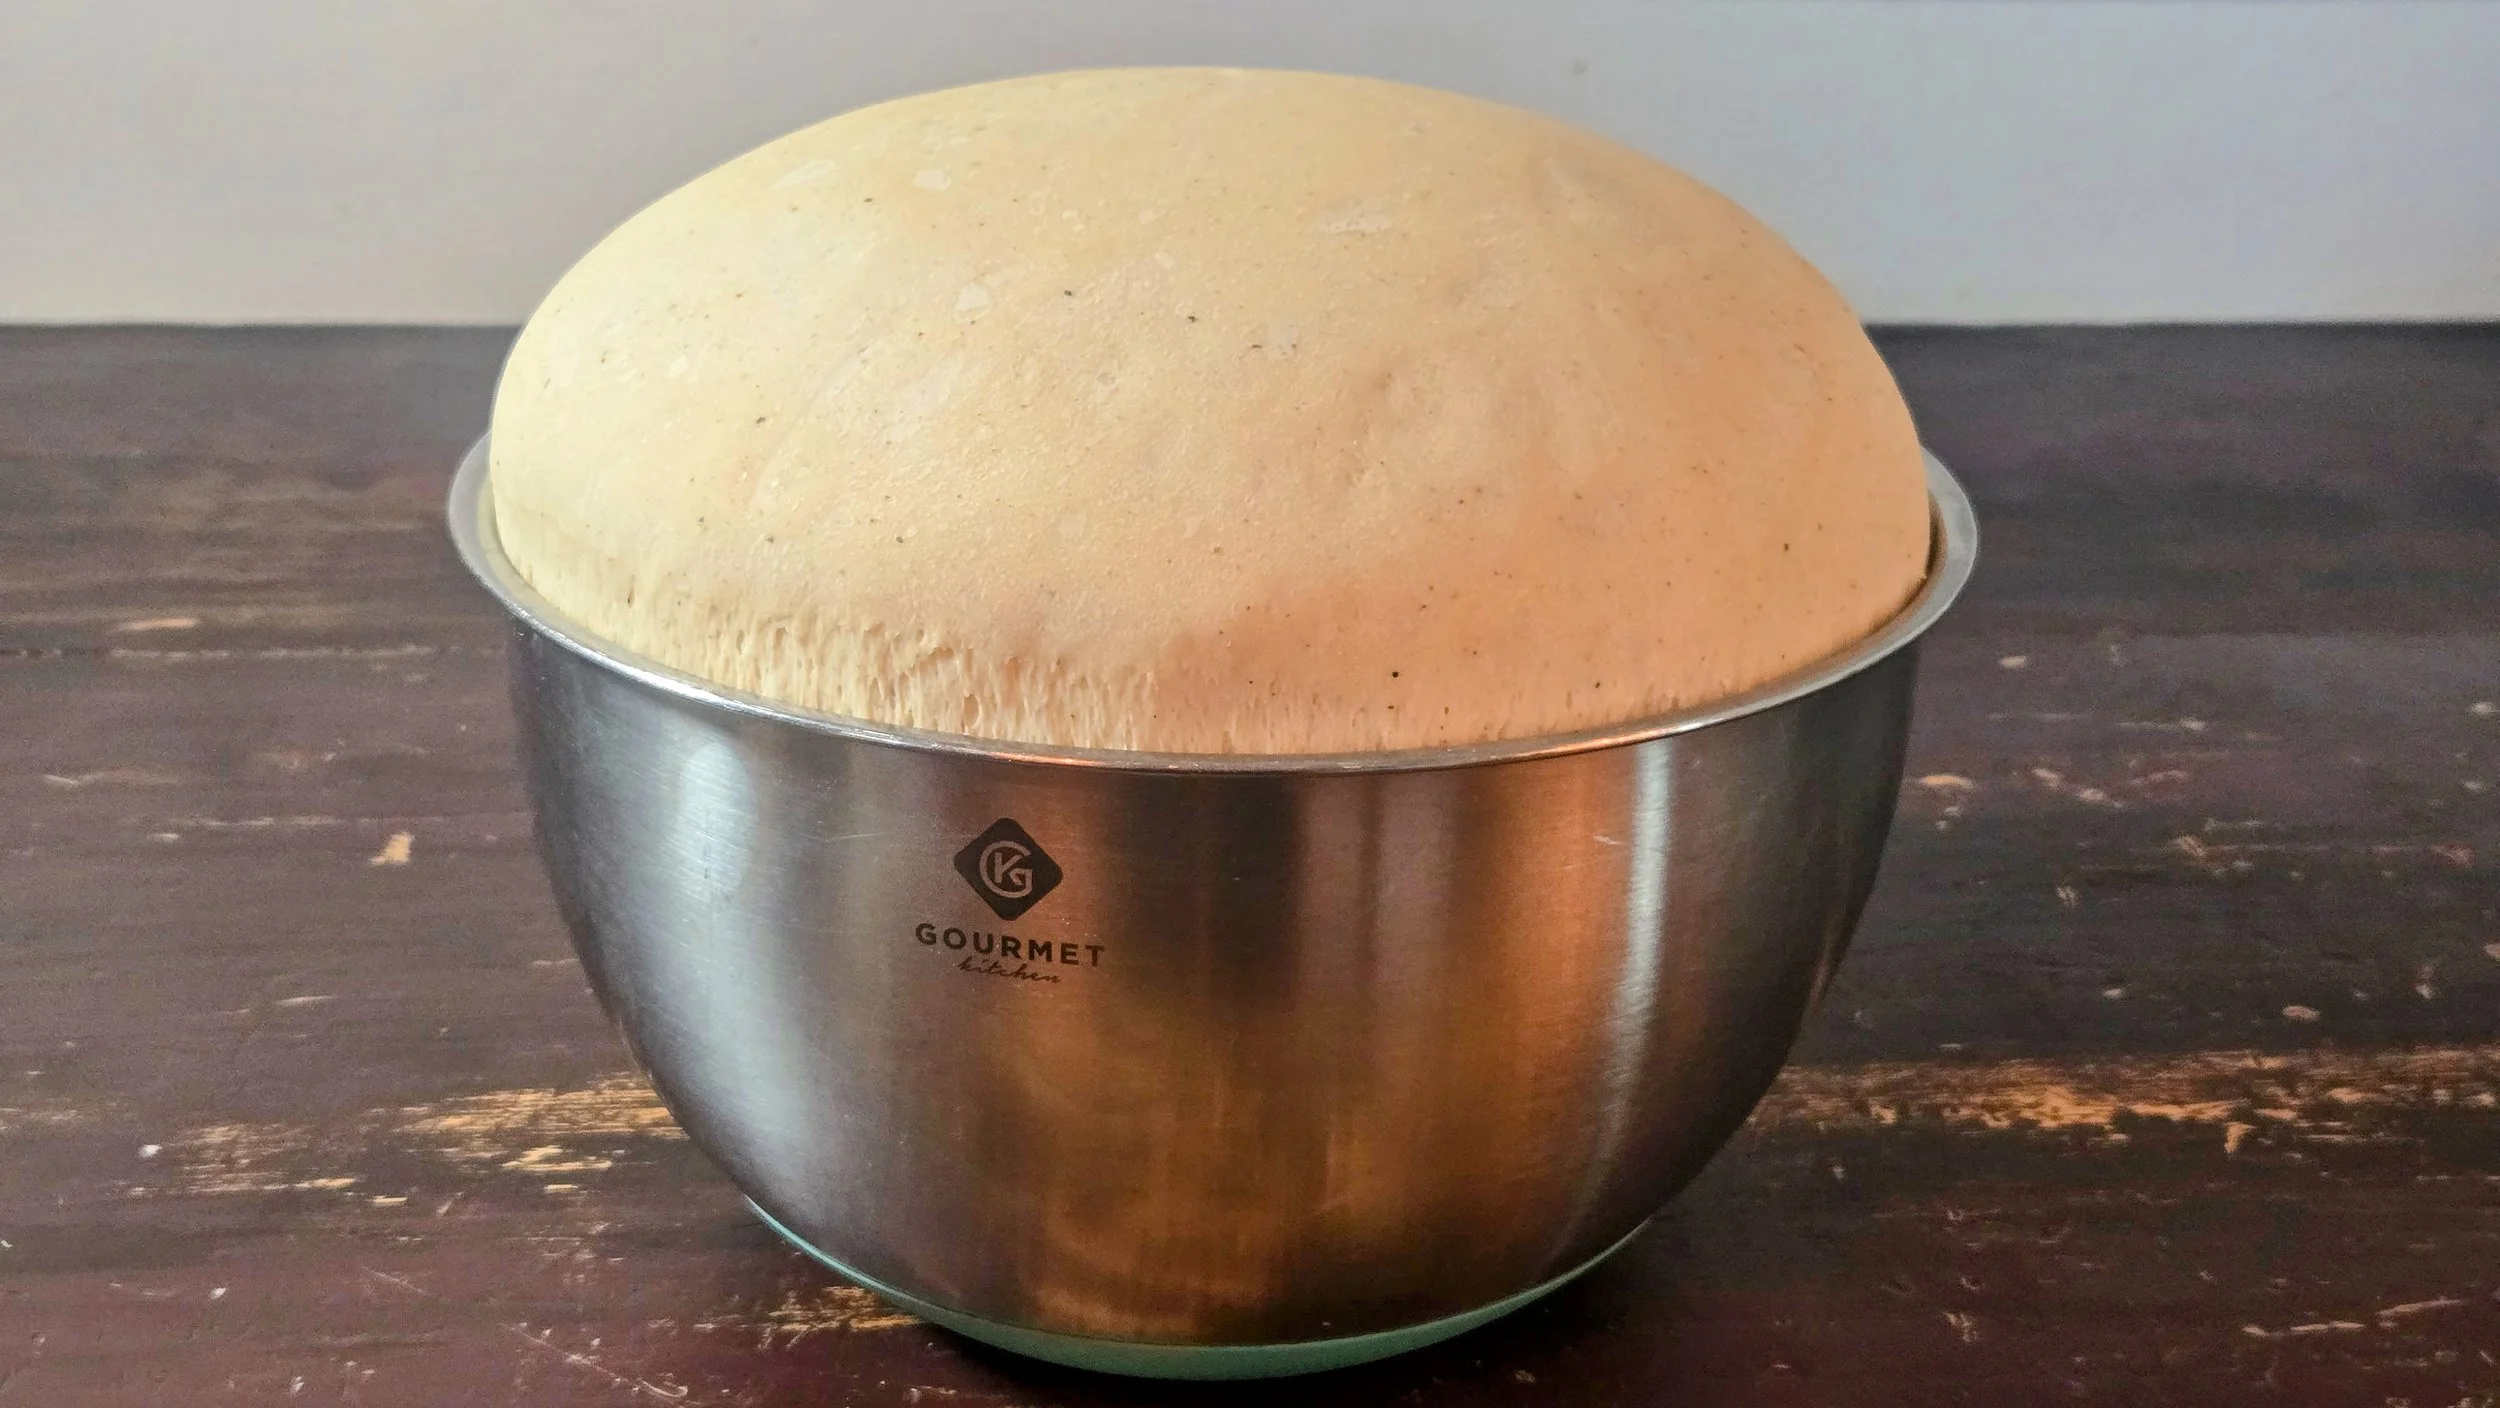
Shape the dough into a ball and place it in the bowl.
Cover and let rise in a warm area for approximately 60–90 minutes, or until roughly doubled in size.
4. Prepare the Filling
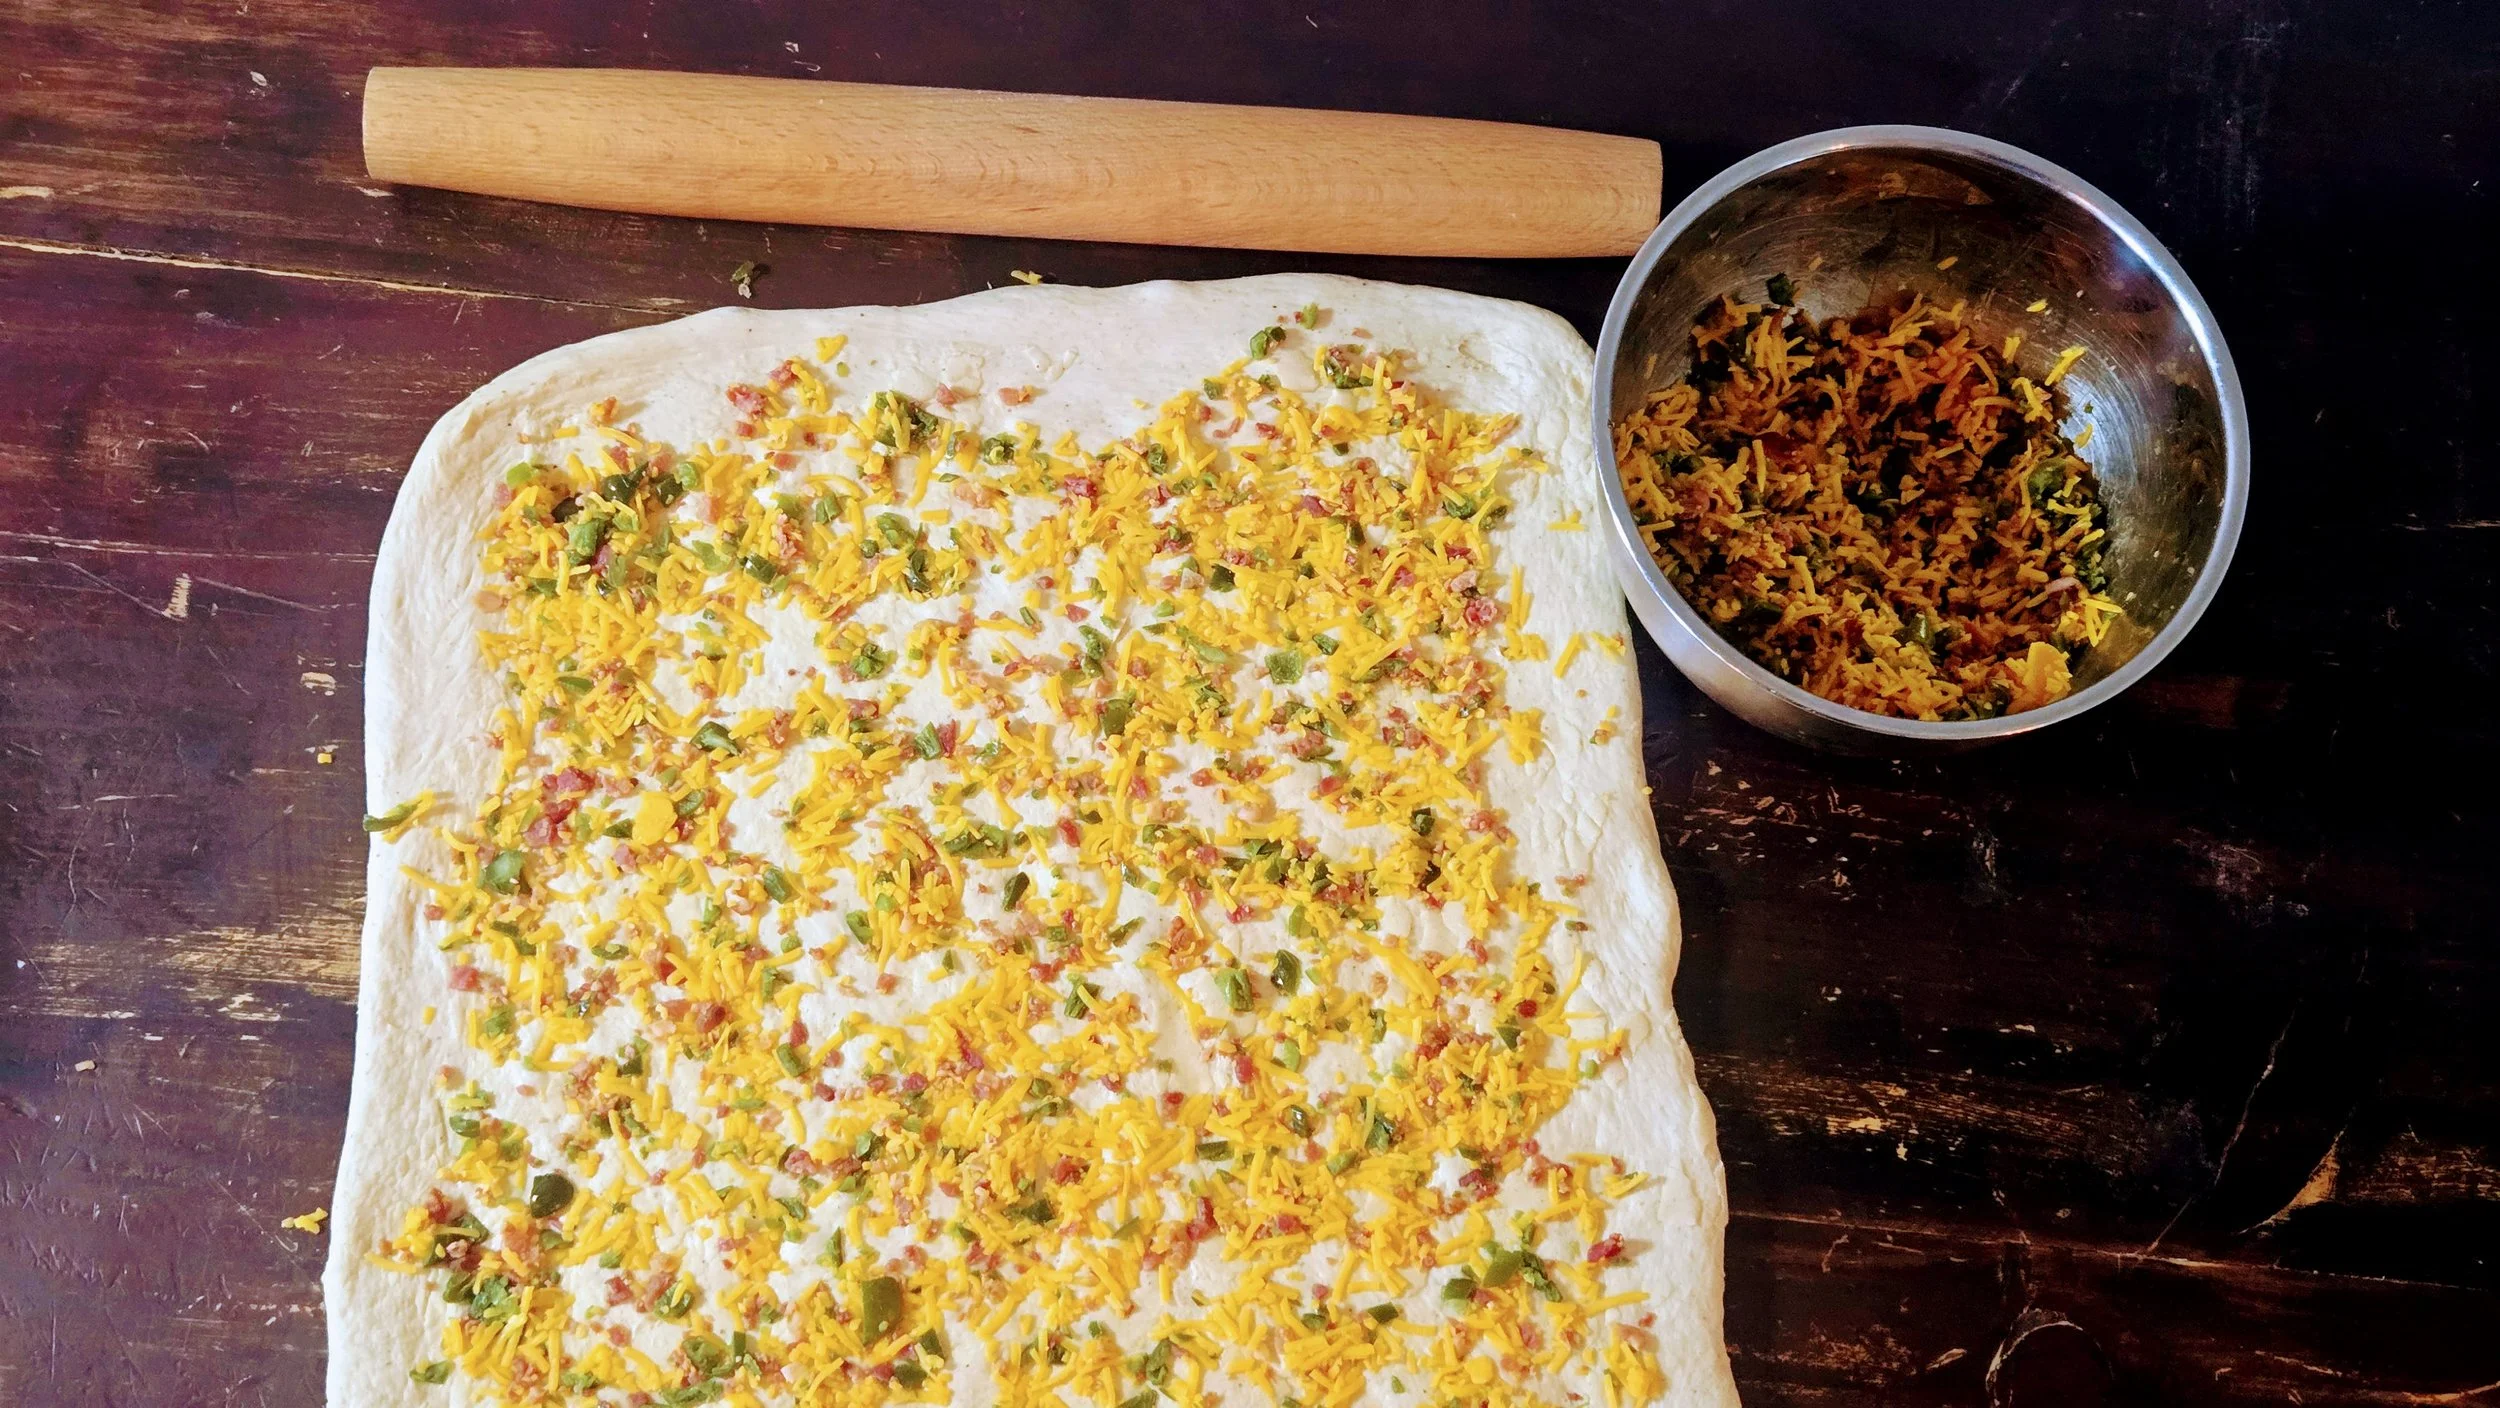
After reserving the topping ingredients, combine:
250 g shredded sharp cheddar
100 g cooked bacon crumbles
The remaining prepared jalapeños
Keep the reserved cheddar, bacon, and jalapeños separate for finishing the loaves.
5. Fold in the Filling
Turn the risen dough onto a lightly floured work surface.
Gently stretch it into a large rectangle.
Scatter approximately one-third of the filling evenly over the dough.
Fold the dough over itself.
Rotate the dough and gently stretch again.
Add another third of the filling and fold.
Repeat with the final third.
Gently fold only as much as necessary to distribute the cheddar, bacon, and jalapeños.
Don't worry about making everything perfectly uniform.
Pockets of cheddar, bacon, and jalapeño are part of the point.
6. Prepare the Loaf Pans
Prepare 2 loaf pans according to the material you're using.
🥈 Stainless-Steel Loaf Pans
Lightly grease the pans.
Cut parchment paper into a strip wide enough to cover the bottom and two long sides of each pan, leaving enough parchment extending above the sides to create handles.
Lightly grease the parchment as well.
Kirby Kitchen Tip: Parchment is strongly recommended when using stainless-steel pans. Melted cheddar can work its way against the pan during baking and make the finished loaf surprisingly difficult to release. The parchment handles make lifting the bread out considerably easier.
🍞 Standard Metal Loaf Pans
Lightly grease with softened butter, avocado oil, or nonstick spray.
Parchment is optional but can be used for easier removal.
🥛 Glass Loaf Pans
Lightly grease thoroughly with softened butter or nonstick spray.
A parchment sling can also be used if desired.
Then I'd change the cooling/removal instructions slightly:
7. Divide & Shape
Divide the filled dough into 2 equal portions.
Gently press one portion into a rectangle approximately the width of your loaf pan.
Starting from one short end, roll the dough into a tight log.
Pinch the final seam closed and tuck the ends underneath.
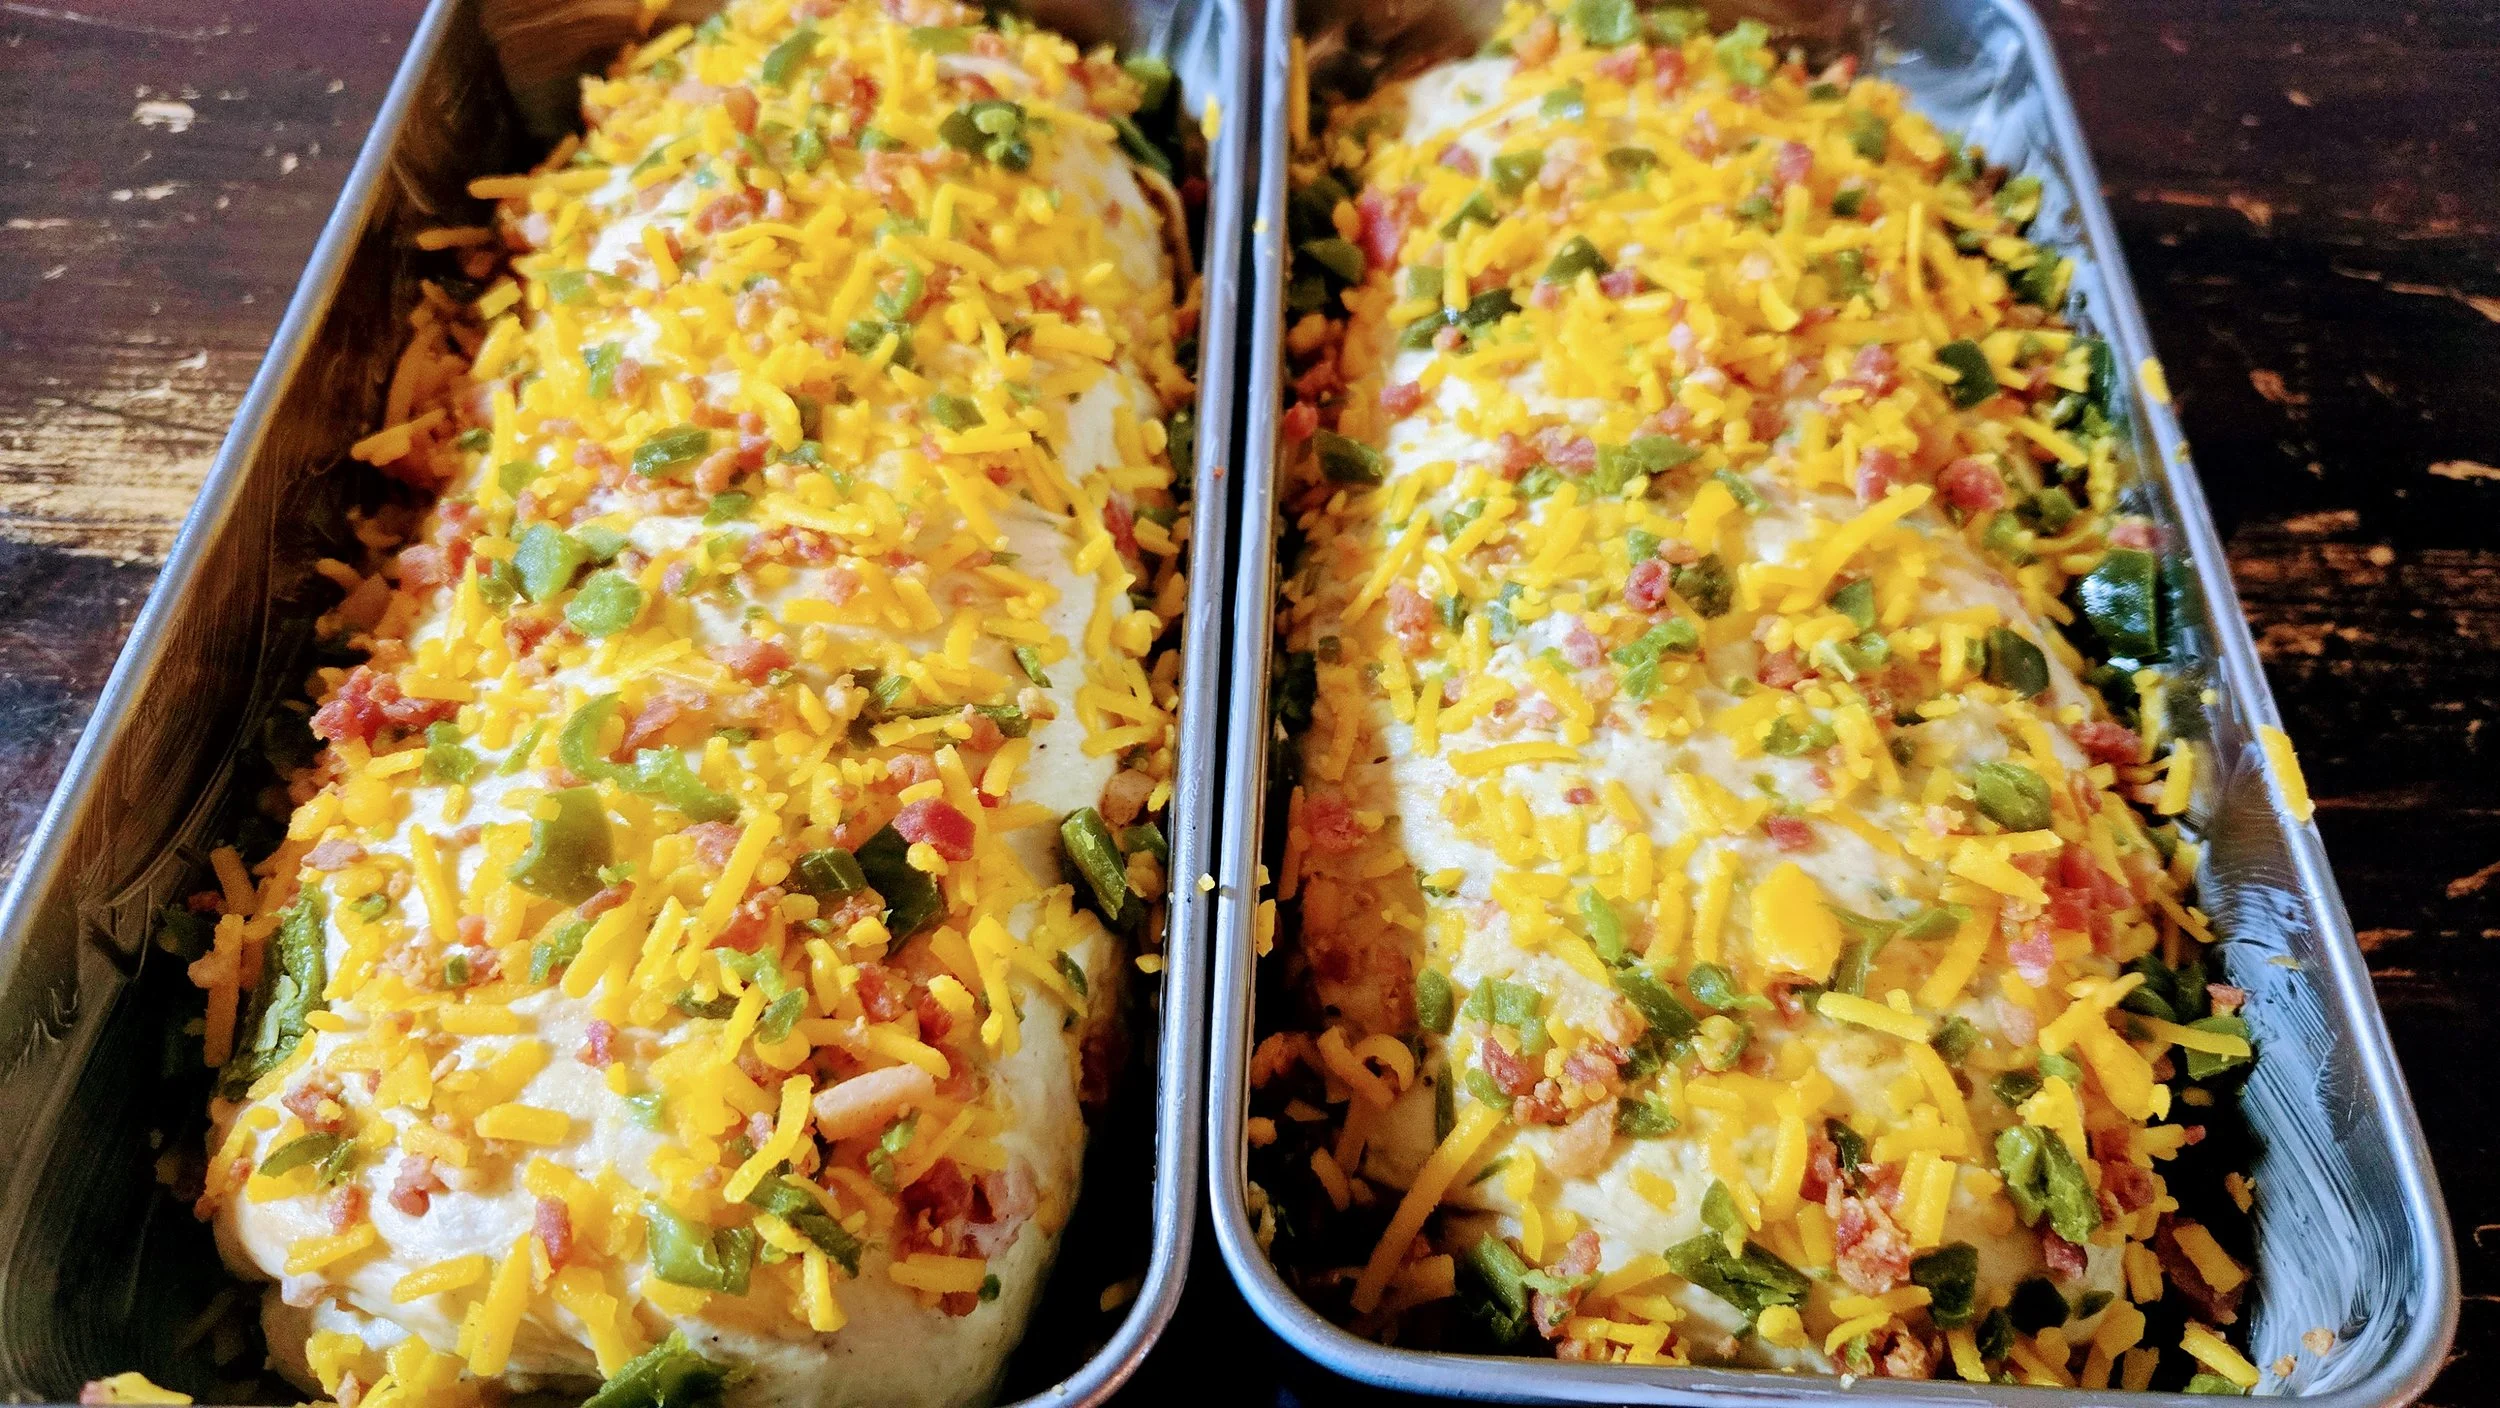
Place the loaf seam-side down in the prepared pan.
Repeat with the second loaf.
Kirby Rule: Don't aggressively degas the dough while shaping. Press out the largest air pockets, but leave enough structure behind for a light, tender loaf.
8. Second Rise
Cover the loaf pans loosely with a clean kitchen towel or lightly greased plastic wrap.
Allow the dough to rise for approximately 30–60 minutes.
The loaves should become noticeably puffy and rise to approximately 1 inch above the rim of the pans.
Use the appearance of the dough rather than the clock as your final guide.
9. Choose Your Baking Method
🥈 Stainless-Steel Loaf Pans
Conventional Bake
Temperature: 400°F
Rack Position: Lower third of the oven
Stainless steel heats evenly but may not transfer as much heat into the bottom of a heavy loaf as darker bakeware.
For the best bottom crust, place a pizza steel or heavy baking sheet on the lower oven rack while the oven preheats.
Once fully heated, place the stainless-steel loaf pans directly onto the hot pizza steel or baking sheet.
If neither is available, place the loaf pans directly on the lower oven rack.
Convection Bake
Temperature: 375°F
Rack Position: Lower third
Use the same pizza-steel or preheated-baking-sheet method when available.
Begin checking the bread approximately 5–10 minutes earlier than with conventional heat.
Kirby Rule: With stainless steel, don't judge the bread by the top alone. A beautifully browned top doesn't necessarily mean the bottom is finished.
🍞 Standard Metal Loaf Pans
Conventional Bake
Temperature: 375°F
Rack Position: Center
Standard aluminum, aluminized-steel, and nonstick loaf pans generally transfer heat into the sides and bottom more readily than stainless steel.
Convection Bake
Temperature: 350°F
Rack Position: Center
Begin checking approximately 5–10 minutes earlier.
If you're using particularly dark nonstick pans, watch the sides and bottom carefully because they may brown faster.
🥛 Glass Loaf Pans
Conventional Bake
Temperature: 350°F
Rack Position: Center
Glass holds heat differently than metal and may require additional baking time.
Convection Bake
Temperature: 325°F
Rack Position: Center
Conventional heat is preferred for glass, but convection can be used.
Avoid placing cold glass bakeware onto a preheated pizza steel, hot baking sheet, or other extremely hot surface.
Avoid sudden temperature changes that could cause thermal shock.
🔥 Smoker Method
Temperature: 400°F**
Use stainless-steel or standard metal loaf pans for the smoker.
Position the pans low enough to receive good heat from below while maintaining airflow around them.
Wood Choices
Pecan — Preferred. Nutty, balanced, and a natural match for bacon and cheddar.
Apple — Mild and slightly sweet.
Cherry — Mild with a slightly richer fruitwood character.
Hickory can be used for a stronger smoke profile.
Kirby Kitchen Tip: A smoker may use a fan, but don't automatically apply the 25°F convection-oven reduction. Smoker airflow and heat behavior vary considerably between cookers.
10. Score & Top
Once the second rise is complete, make one shallow lengthwise score down the center of each loaf.
Divide the reserved:
50 g cheddar
20 g bacon
Jalapeño pieces
between the two loaves.
Concentrate most of the toppings along the center.
Finish each loaf with a very light sprinkle of Firehouse Seasoning.
11. Bake
Use the temperature corresponding to your chosen pan and cooking method.
Stainless Steel
Conventional: 400°F for approximately 30–40 minutes
Convection: 375°F and begin checking around 25–30 minutes
Standard Metal
Conventional: 375°F for approximately 35–45 minutes
Convection: 350°F and begin checking around 30–35 minutes
Glass
Conventional: 350°F for approximately 40–50 minutes
Convection: 325°F and begin checking around 35–40 minutes
Smoker
400°F for approximately 30–45 minutes, checking the loaves as they approach the lower end of the range.
How to Tell When It's Done
Regardless of the pan or cooking method, the bread is ready when:
The top is deeply golden
The cheddar is melted and browned
The bacon is crisp
The loaf has begun pulling slightly away from the sides of the pan
The bottom feels firm and properly baked
The center of the bread reaches 195–200°F
Insert the thermometer into the bread crumb near the center, avoiding a large pocket of melted cheese.
Kirby Rule: Time and oven temperature get you close. Internal temperature tells you when the bread is actually finished.
If the cheddar and bacon begin browning too quickly before the center is finished, loosely tent the top with aluminum foil and continue baking.
12. Remove From the Pans & Cool
Allow the finished loaves to rest in their pans for 5–10 minutes.
For stainless steel, run a thin knife or spatula carefully along the two exposed ends of the loaf if necessary.
Use the parchment handles to gently lift the bread from the pan.
Transfer immediately to a wire rack.
For standard metal or glass pans, carefully loosen the edges if necessary and turn the loaf out onto a wire rack.
Don't leave the bread in the pans until completely cool. Trapped steam can soften the bottom and sides.
Allow the bread to cool for at least 45–60 minutes before slicing.
Kirby Rule: Cheese inside the bread is great. Cheese permanently attached to the loaf pan isn't. Line stainless steel and save yourself the fight.
Performance Notes
🧀 Use Sharp Cheddar
Sharp cheddar provides enough flavor to stand up against the bacon, jalapeños, Firehouse Seasoning, and smoke.
Freshly shredding the cheese also gives it a better melt than most pre-shredded cheese.
🥓 Bacon Without the Extra Work
Pre-cooked bacon crumbles make this recipe considerably faster.
If you'd rather start with fresh bacon, cook it until crisp and drain it thoroughly before adding it to the dough.
Either version works.
🌶️ Frozen Jalapeños Are Welcome
Frozen jalapeños work perfectly well in this bread.
The important part is managing their moisture.
Thawing, draining, drying, and briefly heating them in a skillet keeps excess water from affecting the dough while preserving plenty of jalapeño flavor.
🔥 Firehouse in the Dough
Firehouse Seasoning goes directly into the bread dough rather than simply being sprinkled on top.
That distributes garlic, pepper, paprika, jalapeño, and subtle sweetness throughout every slice.
Because bacon, cheddar, and Firehouse Seasoning all contribute salt, the amount of additional kosher salt is intentionally restrained.
🌀 Three Ways to Make the Dough
A spiral mixer, standard stand mixer, or your own hands can all develop excellent bread dough.
Regardless of the method, the goal is the same: develop a smooth, elastic dough before introducing the bacon, cheddar, and jalapeños.
🍞 Your Pan Matters
Stainless steel, standard metal, and glass all transfer and retain heat differently.
That's why the recipe provides different temperatures and rack positions instead of pretending every loaf pan behaves the same way.
The internal temperature of the bread remains the final judge.
🌬️ Conventional or Convection
Convection circulates hot air around the bread and generally browns the exterior faster.
Reducing the temperature by approximately 25°F helps keep the cheddar and bacon from becoming too dark before the center finishes baking.
🌳 Smoke the Bread, Don't Bury It
Bread takes on smoke surprisingly well.
Pecan provides enough character to complement the bacon and jalapeño without overwhelming the loaf.
The smoke should be another layer, not the only thing you taste.
Ways to Use It
Firehouse Bacon Jalapeño Cheddar Bread is excellent:
Warm with butter
Alongside chili
With beef stew
With chicken and dumplings
Alongside smoked meats
With eggs for breakfast
As sandwich bread
Toasted with cream cheese
As the base for grilled cheese
For breakfast sandwiches
Alongside soup
Straight from the cutting board
Make It Your Own
More Heat: Leave more of the jalapeño seeds and membranes intact.
Milder: Remove the seeds and membranes before chopping.
More Cheese: Increase the cheddar or replace some with Pepper Jack.
More Smoke: Use hickory instead of pecan.
No Smoker: Choose the appropriate oven method for your bakeware.
Cheddar Crust: Add a little extra cheddar during the final 10 minutes of baking.
Fresh Bacon: Cook and crumble your own instead of using pre-cooked bacon.
Fuel Profile — Estimated Per Serving
Calories: ~230 kcal | Protein: ~9 g | Carbohydrates: ~32 g | Net Carbs: ~30 g | Fiber: ~2 g | Fat: ~8 g
Based on approximately 24 slices total from two loaves using bread flour, sharp cheddar, 120 g cooked bacon, jalapeños, butter, honey, and Firehouse Seasoning. Nutrition is estimated and will vary depending on the bacon, cheddar, flour, slice size, and ingredient brands used.
Storage
Room Temperature
Store tightly wrapped or in an airtight container for up to 2 days.
Refrigerator
For longer storage, refrigerate for up to 5 days.
Warm or toast before serving for the best texture.
Freezer
Allow the bread to cool completely.
Freeze whole or slice first and place parchment between the slices.
Wrap tightly and freeze for up to 3 months.
Individual frozen slices can be reheated directly in a toaster, oven, or air fryer.
Performance Tip
“Some bread is meant to sit beside the meal. Some bread makes you forget what else was on the plate.”
Six-Cheese Pitmaster Mac
Kirby Kitchen Signature Recipe
Creamy macaroni baked with the Kirby Kitchen Six-Cheese Blend, a rich tallow Mornay sauce, and a subtle kiss of smoke.
Every family has a macaroni and cheese recipe. This one is ours.
Built around the Kirby Kitchen Six-Cheese Blend, this macaroni and cheese brings together bold cheddar, buttery Gouda, nutty Gruyère, creamy Brie, and savory Parmesan in one incredibly smooth cheese sauce.
Beef tallow replaces traditional butter in the Mornay, adding a rich, savory depth that pairs especially well with smoked meats and backyard barbecue.
Bake it in the oven for a classic holiday side or give it a short trip through the smoker for that signature Pitmaster finish.
This is the kind of macaroni and cheese that earns a permanent spot at holidays, cookouts, and family gatherings.
Recipe at a Glance
Servings: 16
Prep Time: 30–40 minutes
Cook Time: 35–45 minutes
Oven Temperature: 375°F
Smoker Temperature: 225°F
Ingredients
Pasta
2 lbs elbow macaroni
Mornay Sauce
170 g beef tallow
Unsalted butter may be substituted140 g all-purpose flour
600 g whole milk
600 g heavy cream
Cheese
2 lbs Kirby Kitchen Six-Cheese Blend (Performance Pantry)
Website note: Make “Kirby Kitchen Six-Cheese Blend” a clickable link to its Performance Pantry recipe rather than using the old cookbook page number.
Seasonings
3–3½ tsp kosher salt
2 Tbsp garlic powder
1 Tbsp onion powder
2½ tsp dry mustard powder
2 tsp smoked paprika
½–¾ tsp cayenne pepper
1½ tsp white pepper
⅛ tsp freshly grated nutmeg
Instructions
1. Cook the Pasta
Bring a large pot of generously salted water to a boil.
Add the elbow macaroni and cook it 2 minutes less than the package directions.
Drain well and set aside.
Kirby Rule: The pasta finishes cooking while the mac and cheese bakes. Slightly undercooking it now allows the pasta to absorb some of the sauce without becoming mushy.
2. Build the Mornay Sauce
Melt the beef tallow in a large Dutch oven over medium heat.
Add the garlic powder, onion powder, dry mustard, smoked paprika, cayenne pepper, white pepper, and nutmeg.
Stir for 20–30 seconds, just until the spices become fragrant.
Whisk in the flour and cook for 2–3 minutes, stirring constantly.
Gradually pour in the whole milk and heavy cream while whisking continuously.
Continue whisking until the mixture is completely smooth and begins to thicken.
Season with the kosher salt.
Kirby Rule: Briefly blooming the seasonings in the warm tallow wakes up their flavors before the flour and dairy are added, creating deeper flavor throughout the sauce.
3. Melt the Cheese
Reduce the heat to low.
Gradually add approximately three-quarters of the Kirby Kitchen Six-Cheese Blend, adding it a handful at a time.
Stir or whisk gently after each addition until the cheese has melted before adding more.
Continue until the sauce is smooth, creamy, and glossy.
Kirby Rule: Never let the sauce boil after adding the cheese. Gentle heat helps keep the cheese emulsified and the sauce silky instead of grainy.
4. Bring It Together
Add the cooked macaroni directly to the Mornay sauce.
Gently fold everything together until every piece of pasta is coated.
Transfer to a greased 9×13-inch baking dish or divide between two smaller baking dishes.
Top evenly with the remaining Six-Cheese Blend.
Finish with a light dusting of smoked paprika.
Choose Your Finish
🔥 Pitmaster Smoker Method
Preheat the smoker to 225°F.
Place the prepared mac and cheese in the smoker uncovered.
Smoke for approximately 30 minutes, or until the cheese is melted, the mac and cheese is heated through, and the top has picked up a subtle layer of wood smoke.
Best Woods
Pecan — My first choice. Rich but balanced.
Cherry — Mild smoke with a touch of sweetness.
Apple — Light and slightly sweet.
Kirby Kitchen Tip: Mac and cheese absorbs smoke quickly. We're looking for a kiss of smoke—not enough to overpower six different cheeses.
🏠 Classic Oven Method
Preheat the oven to 375°F.
Bake uncovered for 35–45 minutes, until the sauce is bubbling around the edges and the cheese on top is melted and lightly browned.
Let the mac and cheese rest for 10–15 minutes before serving.
This gives the sauce a chance to settle while keeping everything creamy.
Kirby Kitchen Notes
🧀 The Six-Cheese Difference
The Kirby Kitchen Six-Cheese Blend isn't about adding cheeses just to increase the number.
Each cheese has a job.
Sharp cheeses provide bold flavor. Gouda brings buttery richness. Gruyère contributes nuttiness. Brie adds creaminess, while Parmesan provides a savory finish.
Together, they create something none of them could accomplish alone.
🥩 Why Beef Tallow?
Butter absolutely works here, but beef tallow gives the Mornay sauce an additional layer of savory richness.
It's particularly at home when this mac and cheese is served alongside brisket, ribs, pulled pork, smoked turkey, or other barbecue.
🌶️ The Secret Seasonings
White pepper, dry mustard, cayenne, and freshly grated nutmeg aren't supposed to announce themselves.
They're there to make the cheese taste more like cheese.
That's the point.
👨👩👧👦 Built for Gatherings
This is a big-batch recipe for a reason.
It belongs in the middle of a holiday table, beside the smoker at a backyard cookout, or anywhere you're feeding people you care about.
Make Ahead
Prepare the mac and cheese through the assembly step, but don't bake or smoke it yet.
Cover tightly and refrigerate.
When you're ready to cook, remove it from the refrigerator while the oven or smoker preheats.
Because you're starting with a cold dish, expect the final cook to take longer than it would when freshly assembled.
For the creamiest results, I'd make it no more than one day ahead.
Storage & Reheating
Refrigerator
Store leftovers in an airtight container for up to 4 days.
Freezer
Freeze in an airtight, freezer-safe container for up to 3 months.
Reheating
Reheat gently rather than blasting it with high heat.
Add a small splash of whole milk or heavy cream before reheating to help loosen the cheese sauce and restore some of its original creaminess.
Fuel Profile — Estimated Per Serving
Calories: 700 kcal | Protein: 25 g | Carbohydrates: 43 g | Net Carbs: 41 g | Fiber: 2 g | Fat: 53 g
Based on 16 servings. Nutrition is estimated and will vary depending on the specific pasta, dairy, and cheeses used.
Smoked Southern Green Beans with Turkey
Southern comfort. Real smoke. Big flavor.
Fresh green beans are slow-cooked on the smoker with tender smoked turkey, onions, garlic, herbs, Bayou Fire Seasoning, and Voodoo seasoning. Finished with just enough butter for richness and apple cider vinegar for balance, these green beans bring deep Southern flavor without relying on liquid smoke or a stick of butter.
Servings: 8
Prep Time: 15 minutes
Cook Time: 2–3 hours
Smoker Temperature: 300°F
Ingredients
2 lbs fresh green beans, washed and trimmed
1 smoked turkey thigh or leg
1 medium yellow onion, diced
4 cloves garlic, minced
4 cups low-sodium chicken stock, plus more as needed
1 Tbsp chicken bouillon base
2 Tbsp butter, divided
1 Tbsp apple cider vinegar, plus more to taste
Seasonings
1 tsp Bayou Fire Seasoning (Performance Pantry)
1 tsp Firehouse seasoning (Performance Pantry)
1 tsp smoked paprika
½ tsp dried thyme or 3–4 sprigs fresh thyme
¼–½ tsp red pepper flakes
2 bay leaves
Freshly ground black pepper, to taste
Salt, only if needed
Instructions
1. Preheat the smoker
Preheat your smoker to 300°F.
Pecan is a great choice for a balanced Southern smoke flavor. Hickory will give you a stronger smoke profile, while apple or cherry will keep things milder.
2. Build the flavor base
Place a Dutch oven over medium heat.
Add 1 tablespoon butter and the diced onion. Cook for 4–5 minutes, stirring occasionally, until the onion begins to soften and turn translucent.
Add the garlic and cook for another 30–60 seconds, just until fragrant.
3. Add the seasonings
Add the Bayou Fire Seasoning, Voodoo seasoning, smoked paprika, dried thyme if using, red pepper flakes, and black pepper.
Stir and cook for about 30 seconds to bloom the spices.
Add the chicken bouillon base and stir to combine.
4. Deglaze
Pour in the chicken stock, scraping the bottom of the Dutch oven to release all the browned bits.
Add the bay leaves and fresh thyme sprigs if using.
5. Add the smoked turkey
Nestle the smoked turkey thigh or leg into the seasoned broth.
Add a little more chicken stock or water if necessary. The turkey doesn't need to be completely submerged, but there should be plenty of liquid surrounding it.
6. Smoke the turkey and broth
Place the Dutch oven uncovered in the smoker.
Smoke at 300°F for 60–90 minutes, stirring the broth occasionally.
Once the broth has developed a good smoke flavor, cover the Dutch oven and continue cooking until the turkey is tender enough to easily pull from the bone.
7. Shred the turkey
Carefully remove the turkey from the Dutch oven.
Remove and discard the skin, bones, and any tough pieces. Shred or roughly chop the turkey meat and set aside.
Remove and discard the bay leaves and any woody thyme stems.
8. Add the green beans
Add the fresh green beans to the smoky braising liquid and stir to coat.
Return the shredded turkey to the Dutch oven and stir everything together.
Place the Dutch oven back on the smoker uncovered.
Cook for another 30–60 minutes, stirring occasionally, until the green beans reach your preferred tenderness.
For traditional Southern-style green beans, let them cook beyond crisp-tender so they have time to absorb that smoky turkey broth.
9. Finish the pot
Remove the Dutch oven from the smoker.
Stir in the remaining 1 tablespoon butter and 1 tablespoon apple cider vinegar.
Taste before adding any salt. The smoked turkey, bouillon, and Voodoo seasoning already contribute sodium.
Adjust the black pepper, Bayou Fire Seasoning, red pepper flakes, or vinegar to taste.
Serve warm with some of that smoky turkey and pot liquor spooned over the beans.
🔥 From the Smoker
Pecan is the go-to wood for this recipe. It adds a rich smoke flavor without overpowering the green beans.
Keeping the Dutch oven uncovered during the first part of the cook allows the turkey, aromatics, and broth to pick up real wood smoke. Covering it afterward helps tenderize the turkey and keeps too much liquid from evaporating.
No liquid smoke needed—the smoker does the work.
Make It Your Own
Milder: Leave out the red pepper flakes.
More heat: Increase the red pepper flakes or add a little extra Bayou Fire Seasoning at the end.
More tang: Add another splash of apple cider vinegar immediately before serving.
Softer Southern-style beans: Give the green beans the full 60 minutes—or longer if needed—until they're tender and have soaked up plenty of the smoky broth.
Storage
Store leftovers in an airtight container in the refrigerator for up to 4 days.
Reheat the beans gently with some of their cooking liquid to keep them moist and flavorful.
Fuel Profile — Estimated Per Serving
Calories: 190 kcal | Protein: 20 g | Carbohydrates: 12 g | Net Carbs: 7 g | Fiber: 5 g | Fat: 8 g
Based on 8 servings. Nutrition is estimated and will vary depending on the smoked turkey, chicken stock, bouillon, and seasoning brands used.